Adventures in Roasting

Sunday, January 29, 2006

Expense summary

A summary of expense so far...

  • Green coffee beans - $26.11

  • Hot air popper - $0.79

  • Stainless bowl - $2.96

  • Cardboard box - $1.94

  • Wooden spoons - $1.96

  • Total: - $33.76

Cooling

Well, still waiting for the beans (T minus 3 days), but I have almost finished my cooling system. Once the beans have attained the proper degree of roast, it is important to cool them quickly to stop the "baking" that may occur, which apparently will dull the flavor of the coffee.

I can't claim that this cooling device is of my own design, I stole without compunction from INeedCoffee.com. In my variation I use a cardboard box instead of a paint bucket.

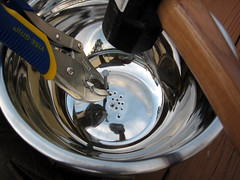
I wasn't able to find the right colander, so I decided to make my own: I picked up a 3-quart stainless steel bowl at Walmart for $2.96. I also got a 14"x14"x14" cardboard box for $1.94 and some wooden spoons for stirring:
IMG_1943

With these raw materials, I started pounding holes in the bottom of the bowl with a hammer and nail:

IMG_1944

IMG_1947

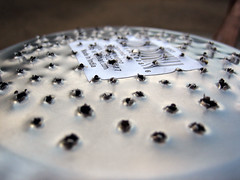
Not exactly a precision job, but hey- airflow is the goal. I will also be stirring the beans, so it's not like it has to have uniform holes. A caveat here is that the bottom of the bowl gets pretty ugly with exit wounds. The bottom also becomes somewhat convex due to the pounding. That's not a problem, in fact, it may be better in that it will cause the beans to move toward the center of the bottom, which has good hole coverage.

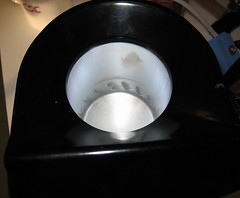
Next I assembled the box and taped it up with masking tape to minimize air leaks. I sawed a hole in the top that just fit the stainless bowl:
IMG_1948

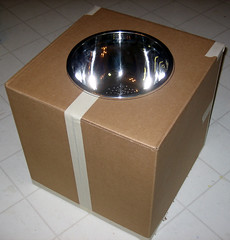
I haven't decided yet whether the bowl should be taped, hotglued or can just sit in the hole. I will insert another hole in the side of the box to accept the shop vac hose. I think this will generate enough airflow to cool the beans within 2 minutes. If it turns out the box isn't sturdy enough, I could shellac it...

In the meantime, I found this video on Google Video by Scott Marquardt that shows roasting with a hot air popper and cooling with a similar cooler (made from a box):

Color chart

Once my beans finally arrive and I try the roast, I am prepared to watch the beans go through the various stages of roasting. This page at Sweet Maria's is very informative as to the roasting stages:


Another very helpful page about hot air roasting is this one from Edward Spiegel.

My task today is to find a metal colander for cooling the beans after the roast. I will try to find one that I can insert in a cardboard box. I'll then connect the shop vac or leaf blower to it to get a strong airflow for cooling. Given the batch size I'll be roasting, it need not be very large.

Saturday, January 28, 2006

Hot air poppers

Hot air popcorn poppers swirl very hot air around the kernels until they pop and fly out of the popping chamber, through a duct and into a waiting bowl. You can use a hot air popper to roast coffee. Coffee will obviously stay in the chamber until it is roasted to the desired degree. The "swirling hot air" method of cooking is called fluid-bed roasting.

One important criterion for a hot air roaster is that the roasting chamber has a solid bottom with air vent holes in the chamber walls. Some roasters have holes in the bottom and will burn the coffee beans, apparently:
roasting chamber

So, when you are searching for a roaster, find one that looks like that above. The typical hot air popper is 1000-1500 watts.

Why roast?

I think you must have a certain level of desire to see just how good coffee could be in order to start giving home roasting a consideration. This is something akin to making your own soap or candles- most people accept the modern convenience of opening a can or vacuum bag and only a hobbyist or the Amish would do otherwise.

However, once you read the rhapsodic prose about fresh-roasted coffee from various blogs and informational sites you think maybe there's something to it. I have not yet tried "truly" (e.g. within hours) fresh-roasted. But I will.

Several of the sites that mention doing home roasting stress the importance of record keeping about your roasting attempts so you can remember your parameters and results and spot trends. I guess since blogs are free, I might as well start one about my roasting adventures and use it to keep records as well. So this blog is mostly a journal of my coffee roasting adventures.

I keep blog-related photos in a Flickr set, and my external roasting-related links are on del.icio.us.

Adventures in Roasting

I have now ordered 4 pounds of green coffee beans from Sweet Maria's and I have acquired my first roaster: A White-Westinghouse Hot Air Popper. The roaster is unfortunately not the canonical "West Bend Poppery II". But it is a 1200W model and it looks almost exactly the same:
future roaster

I found it at the thrift store for $0.79!!! Very low-risk endeavour, so far...

The beans have not yet arrived via UPS ground, so I am waiting patiently. I really wanted to order fewer green beans, but the shipping was going to be the same anyway, and Sweet Maria's has a $15 minimum. So, if it turns out to be a complete hassle, I won't be out too much, anyway. In general, I think Sweet Maria's seems to be the most popular place to order beans for the home roaster, plus they have a ton of information.

Code Name Quantity Price/Ea. Total
----------------------------------------------------------------------
2052 8-Pack Green Coffee Sampler 1 $17.00 $17.00
Shipping: Ground: $9.11
Sales Tax: $0.00
----------------------------------------------------------------------
Total: $26.11


My intention is to keep this blog as a record of my roasting adventures. Maybe the things I learn (or have learned so far) will help someone that is trying it for the first time.